Thursday, 28 November 2013

thanksgiving star garland

This will be my dressers first Christmas in our home.
I am excited by the idea of some festive decorating.
(not yet started...susan! )
Not only is it useful for hiding stuff
but great for displaying recent makes.
This was always my plan for these stars
as I know the recipient has a dresser
and I think I know what she likes.
In fact these stars were rehomed yesterday
and now live with my friend Lisa
whom I call one of my fabric sponsors
because she ALWAYS has a bag of vintage goodies for me.

Life is a precious thing so get living.
 Friends are a special thing so get giving.
Clare

Happy Thanksgiving to you all
xxx

Monday, 25 November 2013

monday making...

... making presents money just cant buy.


made with love
 xxxxx

Friday, 22 November 2013

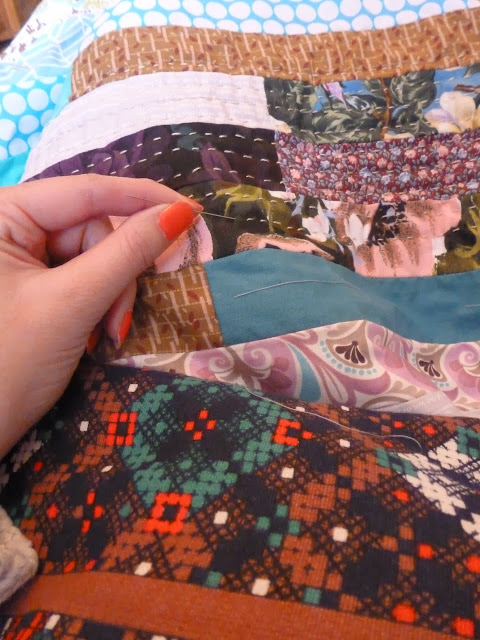
kantha quilting

Have I been living under a rock?
Am I the last to know about kantha quilting?
How have I missed it, with all this evidence around me?
 I know I have seen such quilting
I just had no idea how big of a thing it is right now.
Kantha quilts'quilting originate in India
and are traditionally made from saris 
with simple but heavy stitching.
So it seems I am making a kantha quilts of sorts.
Currently I have stitched 15 out of the 40 strips
and used one whole ball of perle cotton....
that's 82 metres so far.
You work out the maths,
just don't tell me how far I have left to sew
I already think I'm insane.
xxx

*Kantha sources shown.
 Homes and Antiques magazine sep 2006
Granny Chic ~ Dottie Angel and Ted and Agnes.

Tuesday, 19 November 2013

framing notions ~ arsenic and old lace


In an effort to
keep things simple
I had an idea 
and I completed it in a day!
 It started with an old brown frame you know the type.
Just hanging around from my childhood,
not really loved
but sentimentally cherished,
a Farrow and Ball arsenic* tester pot,
a sewing notion from Australia
and some moda fabric from America.
Put them all together...
and we have a fine romance
and not a dark comedy
boo!

*arsenic ~ just about my all time favourite colour!

Friday, 15 November 2013

mini mojo quilt reveal


My mojo quilt has found it's way to it's new home in Australia,  
so I am at last able to share it with you.
It is actually called Susan's Mojo 
after my friend Susan asked me to send her 
some mojo..
and so another quilt is born.
I am very proud of this one
I think it is my best work to date.
In fact I think I work best when I know it's a gift....
must be the love!


The nitty gritties

This mini is hand pieced using the English paper piecing method
although the pattern from Linda Sewards Country Quilts book
is machined.
I have used a mix of modern and vintage fabrics,
the back is a rosali print from ikea
and the binding is my fav Joel Dewberry herringbone.
The quilting is also a mix of machine and hand quilting.
The size approx 25 inch square.
 The label is hand embroidered.
Thank You xxx

Thursday, 14 November 2013

scrappy fabric frame tutorial

It has been too long since I shared a tutorial...
in fact this is more a decoupage technique..
 using fabrics though and not paper.
This is my first attempt at a fabric frame
so let's work through this together!
Here's what you need~
A frame (or something you fancy covered in fabric!)
PVA glue, the type of glue that dries clear
A paintbrush
Scissors
And fabric scraps*
* The point of this little project is purely to use up all those odds and ends.
That said, I can well imagine this would be really cute
with a limited palette of one floral fabric
or spots and stripes.
So lets go!
Start by taking the frame apart.
This first picture is inside the back of the frame.
This lip stops the glass falling out
and is where I began gluing.
When placing your scraps you will need to have at least one straight edge,
cut one if you need to.
Apply glue to the area of the frame that you are about to cover,
and smooth down the fabric with your fingers or a paintbrush.
Take the fabric all the way round the back of the frame 
to create a nice edge.
Continue overlapping scraps
glueing them down as you work around the frame,
always working from the inside out.
Another view from the back of the frame.
The fabric top edge can be neatened during or after.


If something isnt working add another scrap!

Be aware that you will (if you're like me)
get into a bit of a sticky mess,
but at least you are not taking photos (like me!)
Okay still with me?
The picture on the left is the finished frame.
To stop the fabrics fraying and generally hold it all together
paint a layer of glue over the whole frame.
This gives an almost plastic finish,
(if you want to keep the fabric look
then you will have to work very neatly
good luck with that!)
Once dried replace the glass etc....
and add a suitable picture or special postcard from a friend x

Good things to know.
Darker fabrics work better over lights
(as I discovered, see the purple gingham~ whoopsie)
Too much glue will give an opaque look when dried~ boo.
Make sure you remove any fluff from the finished frame
before you coat it in glue.
Admire what you've made
and think of bigger and better things you can cover with this technique!

Wednesday, 13 November 2013

Monday, 11 November 2013

scrappy do


  Come on now we all have scrap bags in need of attention don't we?

 You may find a gem or two
like this label that was destined for Marys quilt
before the fraying began.
 I like to think it's my sentimental tendencies 
that keep me from throwing these things out
and not one of those horrible hoarding behaviours!
Generally speaking scraps usually get turfed out after Christmas
but as I'm in a moving stuff about decluttering mode
here we are...
I have a few ideas bouncing around my head,
but the one that really got the cogs whirring
was Marys reminder of her 
that she made last Christmas......
 Here is my first attempt drying off.
This is so much fun
and all you need is some old baubles, pva glue and scraps..
I dare you to have a go
you wont regret it!

Friday, 8 November 2013

chalk and cheese

 I have been a very good girl this week
and only worked on my wips*
 The issue with wip
is that personal tastes change.
This is the pink quilt I mentioned as unfinished in my last post,
it was started last year (I think)
when I was venturing into machine quilting.....and pink!
Thankfully this morning I finished the quilting
which was a chore.
Quilting should never be a chore,
and one should never be out of love with a quilt..
but it happens!
These quilts are quite different
however with my new outlook on red
I think I may bind both with similar fabrics!
 A chore which I am enduring I am loving
is the mammoth task of hand quilting my scrappy strip quilt.
 The look I am going for is a heavily quilted effect
something that only handquilting will achieve....
it will be worth it wont it?
You know me well enough to know that I don't care what fabric I use
and that I have a stash of oddments that WILL be used.
Well look what I've pulled out to back this quilt.
I often wonder how close to the bad taste line I can get
before I fall all the way over.
I found this fabric in a junk shop
I have no idea what it is.
I imagine it's a 60s/70s dress fabric
maybe terylene?
The thing I love about quilts
is that they should be a patchwork of what you have to hand...
and that you should always love what you quilt xx
ps. my handquilting is very unorthodox
so far I have managed to quilt three strips in two days...
only thirty seven left then..
*wip = works in progress